Samurai Toyota Carburetor Conversion


(the following is a reconstruction of the original "Toy Carb" web page
found at Northcoast Offroad. I have tried several times since January 2006 to
get in contact with Tim Tackett in an effort to obtain permission to host/reproduce
this page to no avail. Tim, if you are still out there, I hope you don't mind
me re-publishing your fine article.... - Jim "Ack" Cambron)
The stock carb on the 1.3L Samurai is a pretty good carb as long as it is
working correctly. But, when something goes wrong, it is very difficult to
get it repaired, and expensive to have rebuilt. There are so many
switches, vacuum pots, and logic circuits, that even remanufactured units don't
always work right. With a remanufactured unit running anywhere from $350 -
$400, most people look for an alternative.
The Weber has long been a
chosen replacement on the 1.3L, and it is doubtful anything will come close to
the on road performance. However, it suffers badly when used in the off
road environment. It floods. You have your choice of flooding going
up hill or down hill, depending on which way you face the float bowl. My
choice is not to have my engine quit in either situation. Anything less is
just down right dangerous. There are a lot of pieces parts available from
Weber that can somewhat remedy the situation, and some people have gotten most
of the bugs worked out. Unfortunately, it seems the solutions don't apply
to every vehicle or installation, and some have tweaked for two years and never
resolved all the issues.
A simpler less expensive alternative for the folks in Canada appears to be the Pony carb taken from a
Hyundai. Unfortunately, those of us here in the states don't have access
to them as they were never sold in the US. Some claim that they were
finicky as well, while others swear by it. Based on it's design, I would
think that it should be pretty reliable as it is simple in it's design also.
For us here in the good old USA, we have to use something different. That would be the Toyota
carb. Toyota has long been recognized for turning out some strong running
four cylinder engines. The carb that is used in this swap comes from the
Toyota Corolla 3K-C 1.2L engine which produced 65HP and 67FtLb of torque at 3800
RPM. This is a very close match to the specs of the 1.3L Samurai engine,
and the jetting is excellent for even modified engines. It has been used
up to 10,000 ft elevations, without any detrimental effects. Since the
jets are the screw in type similar to Holley jets, they could be drilled out if
more jetting was needed for heavily modified engines. The primary jet is
marked 22, and the secondary is marked 47. While I haven't checked, I
think this corresponds to machine drill sizes. The model years for this
particular engine ranged from 1971 to 1979. After that, Toyota went to a
larger 1.6L engine, and the carb is slightly different and has more emissions
stuff on it the later into the model years you go. The carb I used was
from a 1978 Corolla.
When you get your carb, if lucky enough to find one in a junk yard, you need to get the carb, the throttle
cable bracket, throttle return spring bracket, and the fuel line inlet to the
carb. The carb has a Metric thread size for the inlet, and I could not
find a matching inlet at any of the part stores around me. I am sure it is
available from Toyota as are the throttle bracket and return spring
bracket. I didn't want to wait, so I re-tapped mine to take a standard 3/8
pipe thread brass barbed nipple. I haven't had any troubles, just make
sure you tap it while the carb is apart for a rebuild, or if it is a
remanufactured unit, hold the carb so any metal falls out and not into the
inlet.
If you take yours from a junkyard, due to the age of it, plan on a rebuild prior to installing it.
Mine was a rebuilt unit, but the person I got it from had it on the shelf for
several years, and it never seemed quite right until I rebuilt it. The
rebuild is super simple, and easily accomplished. The rebuild kit I used
was a Federated #10459 carb kit. Any parts store should be able to cross
the number over to their brand, and they cost about $20.
The Toyota carb is a direct bolt on to the manifold, and the throttle cable attaches to the Toyota bracket
just like the Samurai carb. The only modification that needs to be made is
to the stock Samurai thermal spacer (red) which is under the stock carb.
The Samurai carb has a 26/30 primary and secondary bore size. The Toyota
carb has a 28/28 primary and secondary bore size. On my truck, I can tell
some improvement at full throttle, but the big benefit comes at the bottom with
a noticeable increase in low end torque, especially when running a torquer cam,
header, and 2" exhaust.
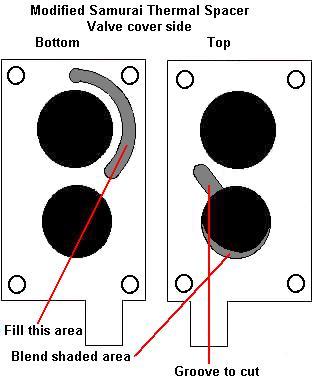
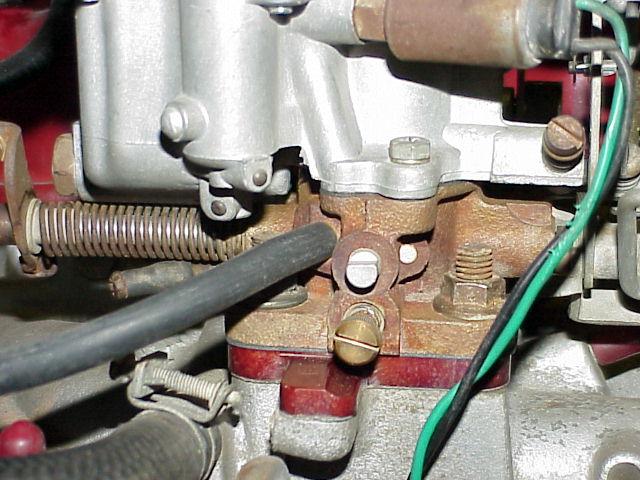
The stock thermal spacer needs to have a vacuum channel filled, and a new
channel cut into. The primary bore should also be blended from the 28mm
bore at the carb, to the 26mm bore in the manifold. If you have the
manifold off, or were very careful, you could enlarge the bore size in both the
spacer and the manifold. I haven't tried this, so I don't know if there
would be any increase in power over the blended spacer. As indicated in
the picture, the channel that needs to be filled is on the bottom side of the
spacer, and the new channel needs to be cut on the top side. I used a 5
minute epoxy stick to fill mine, and a Dremel tool with the small sanding drum
to smooth everything off, make the new vacuum channel, and to blend the primary
bore. The carb is mounted with the float to the rear, as this places the
mixture screw and the throttle mechanism in an easy to reach orientation.
Use the Toyota base gasket as your guide as to where to blend, and the location
of the new vacuum channel.
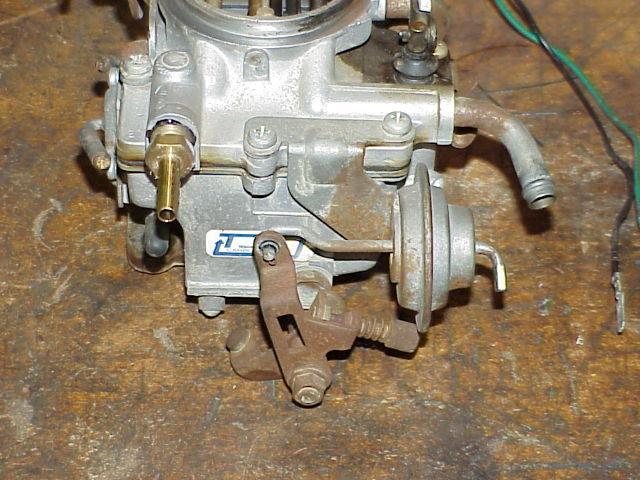
Once you have the thermal spacer prepared, then there are a couple things to do on
the carb. On the left side of the carb, you will find a vacuum pot which
is used on the Toyota as a throttle positioner upon deceleration to lower emissions.
This also use some vacuum switching ports on the Toyota engine, so it won't work
on the Samurai (not needed). I removed this pot, as it's throttle
adjustment screw moved around, and kept messing up my idle settings.
Remove the nut and washer from the end of the shaft, and slide the throttle
screw holder off. Put the nut and washer back on the shaft and tighten it
down.
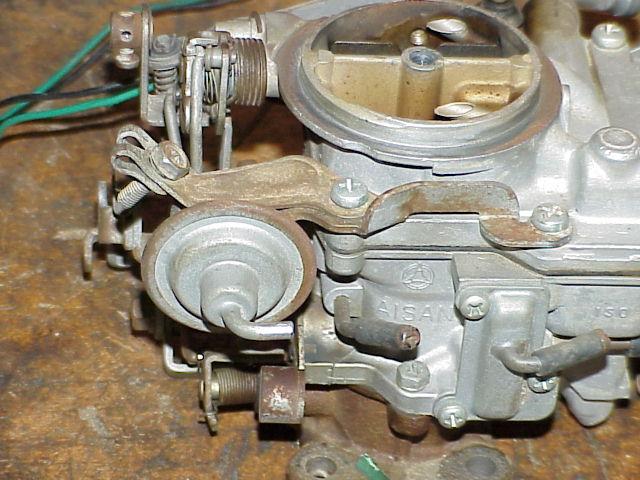
This will leave the lever that the throttle screw worked against in place, but if you
route your hoses correctly, nothing is around it anyway. You could cut the
top half off, but leave the lower half, as it works against a throttle return
spring. Remove the two screws holding the vacuum pot on, remove it, and
replace the screws. The other thing I did, was to remove the linkage from
the choke breaker vacuum pot mounted on the right side top of the carb.
Without the linkage, it let the choke cable work a little easier, and you don't
use this pot either. Note the vacuum port to the right of the choke pot in
the picture, make sure you plug it. That's it as far as modifications go,
pretty simple.
Place your modified thermal spacer back on the manifold using a Samurai base gasket. Place the Toyota
carb gasket on top of the thermal spacer, and your ready to bolt down the
carb. The nut that goes on the outside rear corner closest to the battery
must be threaded on partially when you set the carb on the manifold. Once
the carb is sitting on the manifold, place the Toyota throttle cable bracket on
the back two studs next to the valve cover, and place the return spring bracket
on the front outside stud (I don't have this bracket, so it is not in the
pictures). Tighten the mounting nuts snugly to compress the gaskets, but
don't over tighten them to the point of stripping a stud.
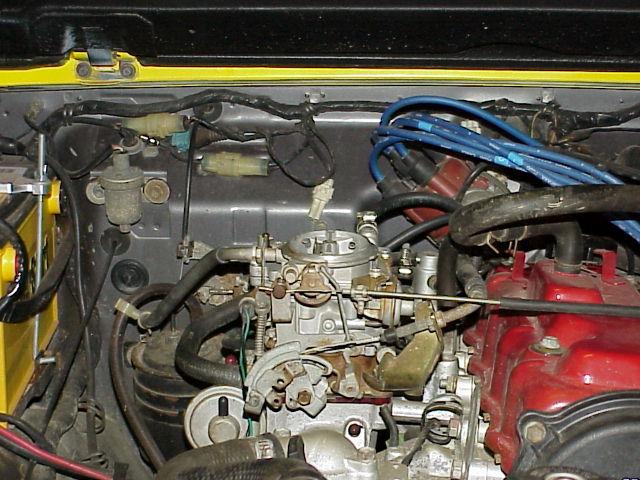
Hook the Samurai throttle cable into the Toyota bracket and the throttle lever on the
carb. You might have to open up the throttle lever hole a little depending
on the size of the fitting on your throttle cable. You will also need to
tweak the angle of the Toyota throttle cable bracket so the end of the Samurai
throttle cable points toward the throttle lever on the carb. Once you have
the cable in the bracket, you will see where you need to tweak it. Set the
throttle cable so there is a little slack in it when the throttle as at the idle
position. You should have already gotten rid of all the vacuum hoses that
were attached to the stock Samurai carb, if not, do so now. Only three
hoses are used, and I suggest putting new ones on so you don't have any vacuum
leaks from old hoses. Install the throttle return spring from the throttle
lever to the Toyota bracket.
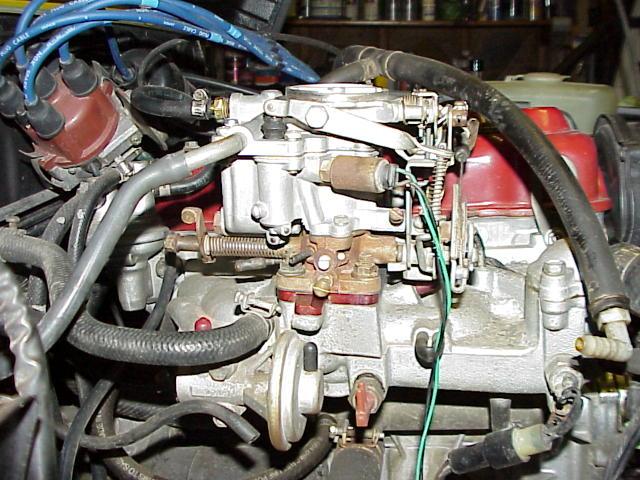
The large hose from the charcoal canister goes to the large tube sticking out of the
top rear of the Toyota carb. The distributor vacuum advance attaches to the side
of the Toyota carb on the vacuum tube located just above and to the rear of the
idle mixture screw on the passenger side of the carb. There is another
vacuum tube sticking out under the throttle shaft at the back of the carb (just
below the big spring left when the vacuum pot was removed earlier). This
tube must be plugged. The small hose coming from the charcoal canister can
be plugged into any of the unused vacuum ports on the intake manifold.
I used one of the two ports located on the passenger side of the intake.
Note, all the unused intake ports must be plugged. Use the heavy vacuum
caps available form your local auto parts store in lieu of the thin colored
vinyl caps. The vinyl caps split from engine heat.
You need to install a manual choke cable available at any NAPA or other auto
parts store, I mounted mine in the little pocket on the lower left side of the
steering wheel (1988.5 dash), and ran the cable out the rubber wiring plug on
the firewall near the clutch cable exit.
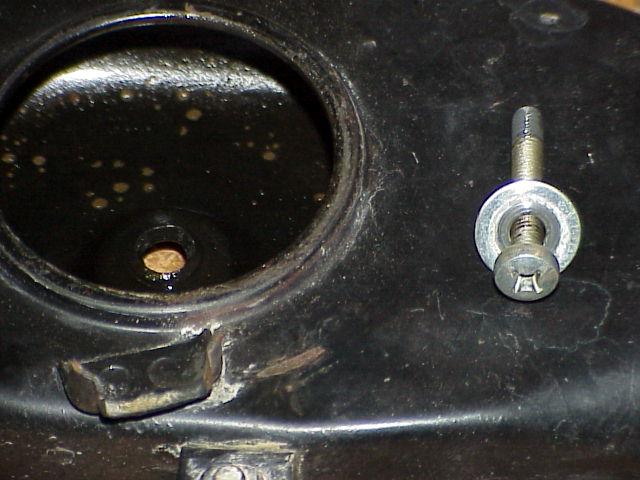
Hook up your fuel line and make sure you have all your hoses in place, and all unused
vacuum ports plugged. The stock air cleaner will bolt right on, but you
need to get a stud nut and washer, or a Phillips machine screw and washer to
attach the air cleaner to the carb air horn. I found that I needed too
dent the air cleaner in just a bit on the front side bottom next the bracket
shown in the picture (small rust line next to the right of the bracket).
if you don't, the throttle linkage will rub slightly, just enough to possibly
prevent the throttle from fully closing and causing the motor to idle a few
hundred rpms high. Not dangerous, but annoying when trying to set the
idle.
By now you have noticed a black and a green wire coming out of the side of the
carb.
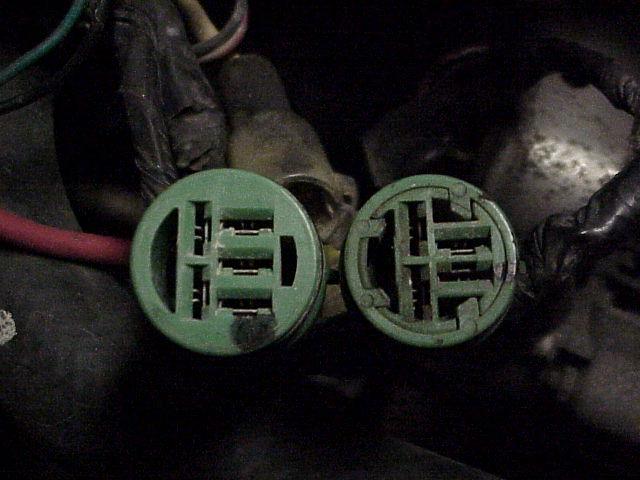
This is the anti diesel solenoid. Take the Toyota connector off the two wires so
you have just the flat blade connector left. Now, find the two green
connector plugs on the Samurai harness near the alternator. Orient them so
they look like the picture. The black wire goes in the bottom horizontal
slot on the left connector. The green wire goes in the bottom horizontal
slot on the right connector. You can use a bit of silicone around the
wires where they exit the connectors, and when cured, use a couple tie wraps to
keep the connectors from moving around. None of the other connections are
used.
Once you are sure everything is hooked up, screw in the mixture screw and then back it out about two and a
half turns and it should be ready to fire up. It helps to have someone to
start the truck so you can fiddle with the idle and mixture screws instead of
having to jump in and out till you get everything set. The idle screw is
the shorter of the two screws next to the throttle lever. The taller screw
on the inside closest to the carb body is used to set the fast idle for the
choke. Make sure the choke cable is set so that it is fully open when the
knob is pushed into the dash. If you push all the way in on the choke cable, and
your idle picks up a bit, then the cable is pushing the choke lever to far open
by about an 1/8" of travel. Start up the engine, and set your idle to
800 to 900 rpms at 10* of timing. You will have to play with this and the
mixture screw a bit till you get the motor warmed up. Your timing should
already be set at 10*. The mixture screw should be turned in or out until
you find the point where the motor starts to run a little rough. At this
point, back it out 1/2 a turn. The choke fast idle should be set so that
the motor runs at 2500 rpm when warm just before the point where closing the
choke more makes the motor start to lope
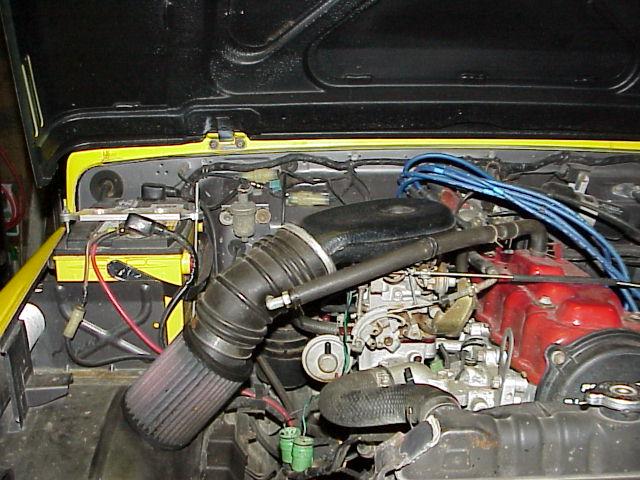
You can also use an aftermarket square K&N filter box or use a K&N filter in
the end of the stock air cleaner rubber snout as seen on my motor here. I
used a K&N GA RU-1760 filter.
That's it, in stock configuration, it will run equally well 45* up or down hill before any hint of
flooding shows up. With a manual regulator installed, it has pulled 60*
hills before any trouble. At that point your about to go over anyway!
Copyright, 2001 North Coast Group, Ltd.. All Rights Reserved. Reproduction, for commercial or
private use without prior written permission, is prohibited.


